How To Design an Aircraft using Fusion 360

by Jon.harman | April 29, 2020 | (4) Posted in How To

Hi, I wanted to share a project I have been undertaking during lockdown. I decided that with all the time I was spending at home I could write a blog to show people how I go about building a 3D printed plane using Fusion 360. I included discussion on the things you need to think about when modelling and I provided screencasts of Fusion 360 so you can follow along. The full blog is at www.rc3dprint.com/blog but I have included Day 1 and Day 2.


I hope you find this useful, enjoy!


---------------------------------------------------------------------------------------------------------------------------

Day 1


What type of aircraft are we going to build? Since it would be great if others would design and build alongside me it can’t be an original. I would love to build a commercial airliner, and it will definitely go on my to-do list but I’m going to park it for now for a couple of reasons, the most important of which is though is I don’t have the EDF’s handy.


After a brief search around the internet I have landed on a Cessa Skymaster.


Designed in 1963 it was a revolutionary design, with the engines mounted inline to avoid  asymmetric handling difficulties. It promised to be the future, merging twin engine reliability with easy single engine handling. By the end of production just shy of 3000 were built by Cessna. It didn’t turn out to be the future of general aviation, perhaps in part due to cooling problems with the rear engine during ground ops, but it still has a devoted following around the world.


From a design and 3D printing point of view it ticks all the boxes for me. It’s unusual enough to be interesting, I have enough motors and props to make it and it looks like something I should be able to fly! Additionally, there was a rare single engine variant built call the Spectrum SA-550, with a small amount of tweaking we’ll have two planes for the price of one!


The easiest way to start modelling an aircraft is to source a 3-view of the aircraft. You can find these on the web for most aircraft but if not you could probably build from just a side view. A few photos from other angles will also help us.
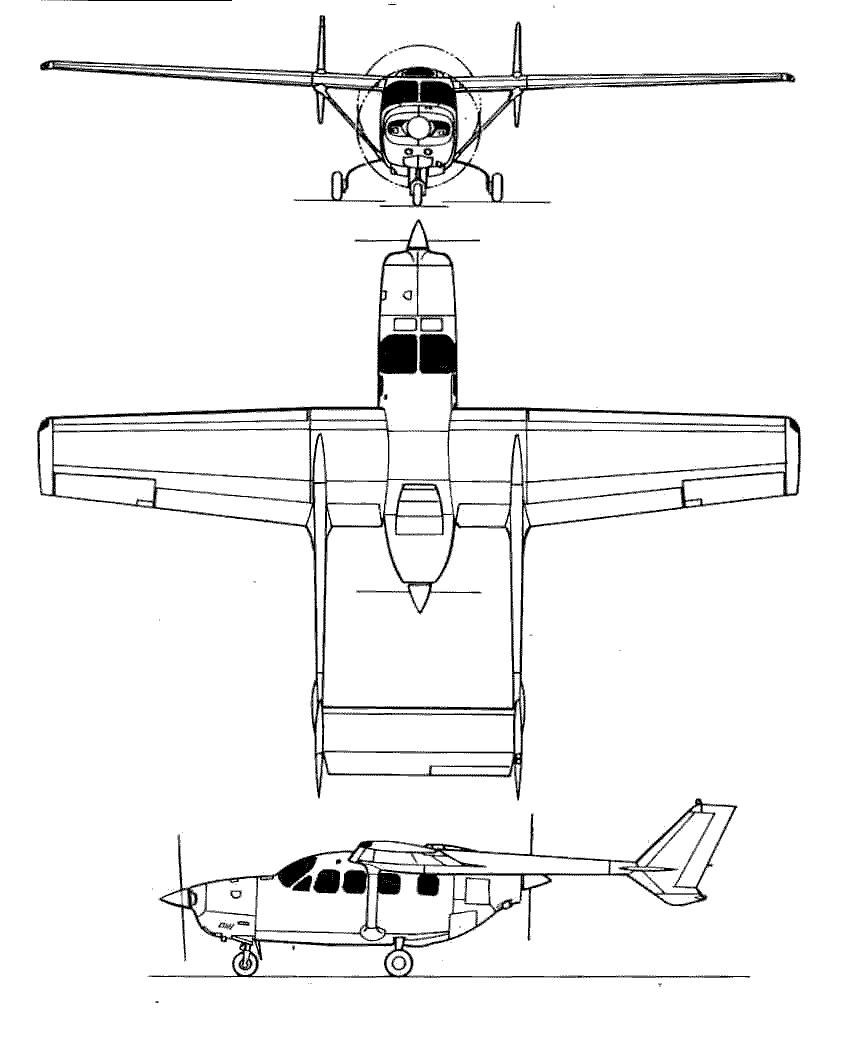
Tomorrow, I'll start modelling the aircraft in Fusion 360 using the 3 view and I'll discuss scale.

 
------------------------------------------------------------------------------------------------

Day 2

Welcome back, today we start sketching out the fuselage in our CAD programme. If you’re new to CAD check out Autodesk Fusion 360, they have education licences for free which might be appropriate for you. 


When you first start with any pro CAD software it is a steep learning curve and can be incredibly frustrating, stick with it! There are loads of tutorial videos on the internet to get you started, after that just get out there and experiment! At the bottom of the page is a screencast of what I did to help you along. Otherwise its back to paper on drawing boards...


I’m going to show you how I go about modelling planes for 3D printing, these are by no means tutorials and I am not a Fusion 360 expert. Perhaps as we go you can show me better ways of doing it?


OK first, let’s insert our 3 profile views on the correct axis, to begin with don’t worry about sizing or positioning them, just put them on the correct planes near the origin. Once, they are in place its time to have a think how to calibrate the images for the real world - how big do we want our plane to be? What is the limiting in the design?


For the Cessna 337 the rear prop will probably be limiting, if we want to be able to use a 10inch prop it has to fit between the tail boom. I have two 8 inch 3 blade props at the moment which I might try to use but I think it is worth leaving enough room for a 9 or 10.


In each of the profile views the front prop is visible so I’ll use this to calibrate the images.


Once all the images are calibrated to the same size line them up. Put the side view on the origin, then shifting the camera around you line up the other views.


Now we are ready to start sketching. In Fusion you need something to sketch on. Use the Offest Plane function and create some planes at various points along the fuselage, usually points where the profile changes are the best places, so the front, at the front of the canopy, aft fuselage and at the back.


Now sketch the fuselage onto the planes we just made. You may need to refer to side and top views to check your sketches for accuracy. To make sure you don’t have asymmetric sketches only sketch half the fuselage, then sketch mirror on the the other half. If the ends of the two lines don’t meet exactly you can use the ‘coincident’ constraint to match them up.


Once you have a few of these fuselage profiles sketched out make a sketch of the side profile.


Tomorrow, we’ll use the ‘loft’ and ‘sweep’ functions to model the fuselage.


COMMENTS

No Comments Yet

Be the first to leave one!

You need to log-in to comment on articles.


How To Design an Aircraft using Fusion 360