I first got struck by this idea back in 2010. The idea of sending a RC plane that I could control via FPV into the stratosphere really gripped me. I didn’t have close experience needed to get a video link to work that far, nor an RC link. So I filed in the back of my mind with the label of a dream. Two years later I had the experience, the knowledge and the funds to finally try to make that dream a reality.
First choice I had to make was which airframe to use. I needed something small, light, strong, spacious fuselage, capable of carrying a gopro, with good wind penetration and reasonable glide ratio. In my mind choice was simple, a FunJet. It easily for filled all my requirements and I already had a lot of experience flying it FPV. Unfortunately Multiplex announced that they would stop making them in favor of the much heavier FunJet ULTRA. So I quickly bough two before they became scarce.
Before we go on I have to say that this project has been cursed for me. I lost almost all pictures of the build except the last ones. So unfortunately I’ll have to use words to describe what I did rather than show it.
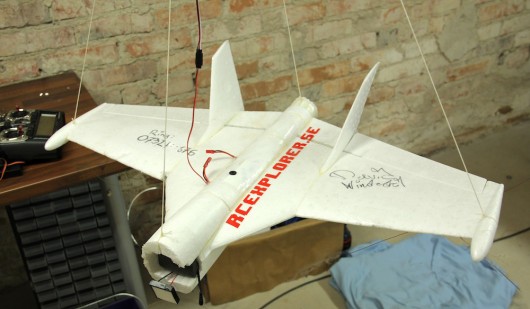
This is the Space FunJet on the eve before the launch.
There were a lot of things to take into consideration when building the Space Glider. For instance, during the ascent the temperature can drop to minus 40 or even 50°C. I had to make sure that the electronics, batteries and servos all could survive and operate with such a harsh environment.
The servos took some time to figure out. After a lot of testing I came up with a solution that worked well. First of all you have to remove the grease in the gears. The colder it gets the thicker it becomes. Second thing I did was mounting the servos inside of the fuselage, where hopefully they would stay nice and warm. I used “U” shaped control linkage and mounted the servo with the output shaft in the middle of hinge line of the control surface. That way I could mount the servos in the back where I had the most space. It also didn’t hurt to have the weight in the back as I had the camera up front.
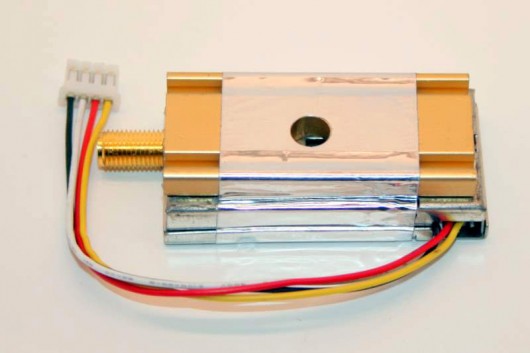
The video transmitter I ended up using was the Lawmate 1W 1.2GHz. If I could go back I would probably chosen a different one. But I already had this one and the range tests with a Old Man Mike Optimized Pinwheel + The Gatling receiver antenna were satisfactory.
This transmitter gets quite hot while running. Normally that is a problem, but in this application it is actually very welcome as it will keep the rest of the electronics warm inside of the fuselage during the ascent and decent. To make sure that it didn’t overheat while at the ground and low level altitude I installed a small 40mm fan next to it. This also helped distribute the heat throughout the fuselage during the extreme cold section of the flight.
However a fan is only effective when the air is sufficiently dense. Which it is not at the peak altitude. Even though it’s really cold up there, there is no air to absorb and move the thermal energy, which means that the video transmitter can overheat even in sub zero temperatures. Therefore it’s also important to have something to absorb and move that heat that is directly connected to the heat source. I used the 1S 2200mAh liPo battery that I powered the GoPro with.
Here is that battery. It’s just one cell I took from a 3s2200mAh where the other two cells were damaged in a crash. The GoPro draws ~450mA when recording in 1080p and during my tests the original 1100mAh battery lasted for a little more than 2 hours in room temperature. The 1s2200mAh battery lasted well over 4 hours. LiPo’s really don’t like being cold, the voltage drop increases dramatically. Having the video transmitter strapped to the battery ensured that the battery kept warm and cosy through out the flight.
While were on the subject of batteries I might as well talk about how I powered the video transmitter and the rest of the electronics. I did some research, a while back for another project, on which the most energy dense batteries that were easily obtainable and I stumbled across the Energizer Ultimate Lithium AA batteries. The reason I remembered these batteries were that they were rated for use in temperatures down to -40°C. They are non rechargeable, disposable, 1.5V (1.8V unloaded) Lithium/Iron Disulfide rated at 3000mAh at 250mA (21°C). (Click here for the spec sheet). I picked up a couple at the local grocery store to try out, and they are quite impressive. At of 1A continuos discharge in -20°C temperature I got 2600mAh before the voltage dropped bellow the the sync voltage of the video transmitter.
The electronics in the plane didn’t draw more than 500mA average current, which means that the battery should last at the very least 5 hours.
I simply soldered 8 batteries together in series to make a 12V that only weighed 120 grams. Less than half than the weight of a 3s3000mAh and much more temperature tolerant.
Just in case I didn’t manage to land the plane at my feet, I installed a GSM GPS tracker. It’s pretty straight forward to use. Simply send a text message to it and ask where it is and it sends a text back with the coordinates. I got it of ebay a year previously, unfortunately I can’t remember the manufacturer of it.
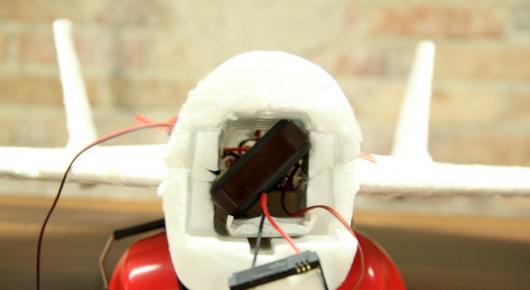
Made sure that the GPS tracker fit in the fuselage.
I left the GPS tracker unmodified with it’s original battery and simply wrapped it in a balloon to make it water resistant.
To be able to release the plane from the balloon before it burst, I made this simple rope cutter. It’s just a 10 ohm resistor that is hooked up to a RC switch. When I activate that channel on the receiver 12V is applied to the resistor. Ohms law tells us that the current passed through a 10 ohm resistor at 12V is 1.2A. That is 14.4W, way more than the 1/4W the resistor is rated at. This will make the resistor heat up to the point where it’s so hot it starts to glow. It doesn’t burn out straight away, in fact it usually last for 10-30 seconds before finally burning up. This energy is plenty to melt the rope and release the plane. But just in case, I glued a match head to the resistor, to give it a bit of a boost. When the match ignites it’s self oxidizing, which means that it creates it’s own oxygen and can therefore burn (for a short time) in a vacuum. This is the same method I used to remotely ignite fireworks in RC Tank Battle and Hunting hydrogen balloons video, so I know it’s reliable.
To have the plane rock as little as possible during the ascent I anchored in the four “corners” of the plane. You can also see the cut down system in place. The JST connectors on the outside of the fuselage is to activate the electronics on the inside.
To measure the altitude of the balloon had to use a barometric pressure sensor (BMP085) hooked up to Arduino mini. Nearly all GPS receivers have a hight limit of 18km and a speed limit of 1852km/h, after which they stop functioning. Some GPS units function above this altitude, but they are scares and hard to come by. This is a restriction built in to the software ,so the GPS can't be used to control missiles. A friend of mine helped me write the code to read the data from the pressure sensor and store it. I'm not going to pretend to know half of the code and unfortunately he doesn't have the source code saved anywhere where he could find it. But he said that the code was mostly copied straight from the example code here. The BMP085 pressure sensor is only rated down to 300 hPa but as many others before me has concluded is that it's solid way bellow that.
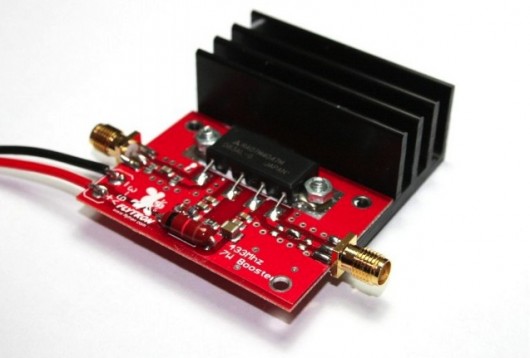
To control the plane I used the OpenLRS long range system from Flytron, hooked up to my Aurora 9 radio. The stock OpenLRS is not that long range so to get the range needed I used the 7W booster they sell as well. I ran it at around 2W hooked up to a 4 element DIY Yagi 9dBi antenna. On the receiver I used a DIY Turnstile antenna. If I for some reason would run out of range on this setup I could easily increase the voltage to the booster and jump it up to 7W. All the the range tests I did were solid at 2W, but it’s always a nice comfort to have that extra oomph in your back pocket.
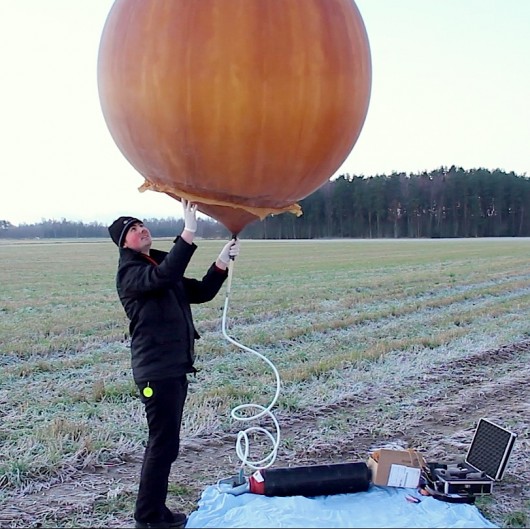
The balloon I ended up using. It’s a cheap army surplus sounding balloon. It’s advertised as a 2200 gram balloon on ebay. But once you cut of the apron, it’s roughly equivalent to a 800g balloon. The reason I chose this balloon was mainly that it was cheap, easy to get and already proven. Many others have used it in their space missions with success.
Normally you use helium to fill the balloon. But where I live helium is ridiculously expensive. So I went with the much cheaper alternative, hydrogen. It’s also more buoyant, about 8% more. Which means a higher burst altitude as you can use less gas. But it’s also extremely flammable and very easy to ignite, even with just static electricity. So if you don’t know what you’re doing I highly recommend staying away from it.
Filling the weather balloon.
To know how much you need to fill the balloon you can use this calculator. I substituted the weight of the payload and the free lift I needed with a hammer and a roll of MIG welding wire. As soon as the ballon could lift that weight I knew it was time to stop filling it.
Another tricky bit about any space mission is to predict the flight path of the balloon. There are so many factors to take into consideration such as jet streams, masses of air layers moving different directions is just mentioning a few. I found this awesome balloon trajectory forecast, where you just input the launch coordinates and it gives you a google earth KML file with the whole flight path. It’s spooky accurate as well. The ballon burst at almost the exact spot it predicted. I highly recommend using it if you’re planning a space mission of your own.
Here is the video on how the space flight went. I narrated as best as I could to explain what happened:
I did record the video from the ground station, or at least I though I did. I started the recording, but for some reason the sandisk V-mate decided to stop recording after 12 seconds. So I lost that video. I also forgot to start the GoPro I had in the car in all the commotion. So unfortunately the only footage I had left after the very intense day were from the plane.
Unfortunately I failed the mission I set out to do. But now I’m an experience richer, plus I got really cool footage.
30 seconds after launch
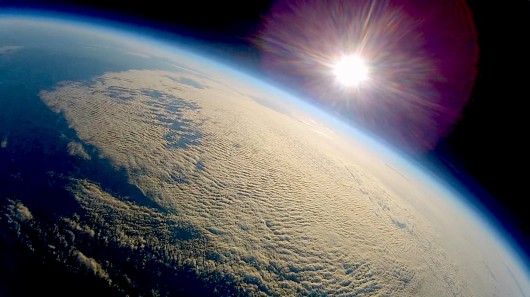
33103 meters above sea level (+-10%) 67 minutes after launch.
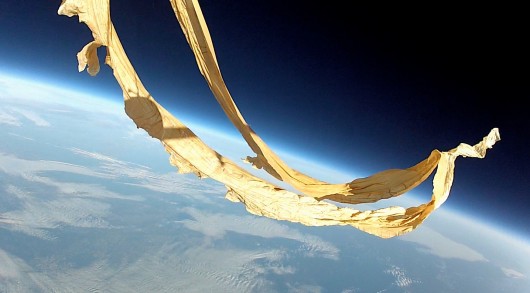
Balloon burst. Note the shadow of the plane in the balloon.
I stitched this photo from 50 still frames from the video. It’s not really the whole earth, the curved lens of the GoPro just makes it look that way.
Total flight time was 108 minutes. Total distance between launch and landing site was 101km.
Video TX: Lawmate 1.2GHz 1W
Video TX antenna: Old Man Mike Optimized Pinwheel
Video RX: Lawmate with modified SAW filter
Video RX antenna: The Gatling
RC TX: Aurora 9 with OpenLRS + 7W booster running at 2W
RC TX antenna: 4 element DIY Yagi
RC RX: OpenLRS
RC RX antenna: Turnstile antenna
OSD: SimpleOSD XL
Camera: GoPro 2 with 32GB SD card and a 1S 2200mAh battery
Altitude sensor: BMP085
Onboard battery: 8S Energizer Ultimate Lithium
Servos: HTX900
If you want to attempt your own space mission, please check the local laws of you contry and seek the appropriate clearance from the goverment entity in charge of flight safety.











Log In to reply
Log In to reply
Log In to reply
Log In to reply
Log In to reply
Log In to reply
"FAA clearance is not difficult to obtain for a weather balloon launch. We contacted them last summer when David wanted to conduct this mission here. They were very friendly and accommodating. Unfortunately, because of a series of technical and weather related issues we weren't able to complete the mission"
"I encourage anyone to ensure they are compliant with proper procedures and regulations before attempting anything like this."
Of course Chad is referiing to last summer when they attempted to do it back then and I read it to mean he did the same for this particular mission since Dave is in the States right now.
Log In to reply
Log In to reply
Log In to reply
Log In to reply
Log In to reply
http://forum.flitetest.com/showthread.php?3128-FPV-To-The-Edge-of-Space
Since you we're the first....YOU WIN!
Stop by the next time you're on Hatteras Island, and I'll buy you the best seafood dinner you've ever had!
Log In to reply
Log In to reply
Log In to reply
Log In to reply
Log In to reply
Log In to reply
Log In to reply
Log In to reply
Log In to reply
Log In to reply
Log In to reply
Log In to reply
Log In to reply
Log In to reply
Log In to reply
If that wasn't accomplished prior to the flight, I find this extremely troubling and highly irresponsible as you quite possibly could have endangered aircraft transiting this area unaware of what was going on and what they possibly could have collided with.
This is serious guys, I'd hate to see an event like this bring unnecessary severe restrictions on our hobby and the rest of us because the proper thought wasn't put into the ramifications that could come from the restricted airspace this flight operated in. This quite possibly could have very serious consequences that you haven't thought about.
Log In to reply
I encourage anyone to ensure they are compliant with proper procedures and regulations before attempting anything like this.
Log In to reply
Log In to reply
Log In to reply
Great work David!
Log In to reply
Log In to reply
Log In to reply
Log In to reply
Where it clearly states under the government guidelines - No one may use a high-altitude weather balloon to drop objects (i.e. gliders and projectiles) among other restrictions.
Log In to reply
Log In to reply
Log In to reply
Log In to reply
I just don't want you or anyone else to get themselves in trouble and be the cause for serious ramifications or government regulations restricting our hobby anymore than they already have the AMA has spent a great deal of money and time fighting for our hobby in Washington.
The recent drone incident near JFK airport in New York and the response by both the FAA and the FBI is a good example of what we really don't need to be faced with in this hobby.
I agree, the FAQ link @ http://www.stratostar.net/faq/ is a good source for starters as well as FAA.gov we have to each be responsible for our actions if we are going to continue to enjoy the hobby as it is today.
Log In to reply
I got a new hero....
Log In to reply
Log In to reply
Log In to reply
Log In to reply
Log In to reply
Log In to reply
Log In to reply
Log In to reply
Its a shame you lost the ground station footage. You mentioned in your article that you first 12 seconds? For whatever its worth why dont you put that up.
Log In to reply
I don't think you guys understand just how difficult it is to sight another airliner at that altitude much less a small Rc glider. When you are traveling at over 600kts @ 41,000ft you could not sight an RC Glider with a Go Pro camera on it if your life depended on it and you knew exactly where to look.
Conducting these flights without the proper clearances, waivers and notification to aircraft overhead is irresponsible, and you could possibly be putting someone's safety or life for that matter in danger. That is the problem I am having with all of this and the attitude here that is being supported by those responsible for publishing the Flite Test web site and this article without having followed much less referenced the proper warnings as to why anyone shouldn't try to do this on their own.
Considering the recent response from the FAA and the FBI in regards to the recent drone near miss incident near JFK airport, you guys need to recognize the ramifications on our hobby if an incident happens that gains greater attention or endangers or hurts anyone. There are already a large number of people in Washington that are ready to ban parts of our hobby all together, irresponsible articles like this supported by organizations like the Flite Test web site are only going to assure that happens if we are not careful and see this for the problem it really is!
Log In to reply
Log In to reply
Log In to reply
Log In to reply
A few questions
would powering the plane make it to heavy? I suppose 1 minutes at 30 Kms does not really help they much to bring it home?
what about an auto pilot return ?
did you need to heat the electronics, or did the 1 W TX heat sink do the job for you?
How far did it travel from the launch was it around 30 Kms?
amazing project!
Log In to reply
Log In to reply
Log In to reply
Log In to reply
even if David W is flying in Sweden, it's not worth even risking the micro chance of sending an airliner down--not to mention terminating our hobby.
Just because there isn't a law against it doesn't mean it's a good idea. Also someone on the rcexplorer site comments authoritatively on the thread about David following AMA guidelines--ummm, one of the guidelines is line of sight (which he lost to cloud cover seconds after launch; forget about altitude and distance rendering the plane unseeable) another guideline is having a spotter (his companion was driving the car, not spotting the invisible plane).
I love this aspect of the RC hobby; but actions like this will love it to death. It's not likely that an airline would get tagged, but could you live with yourself if something went wrong?
Log In to reply
if David's inspiring design mind can flub getting his ground station recorded, didn't think about the balloon/rigging snagging the antenna loops and that rigging design itself looks fairly snaggly to the point that the whole exercise almost failed--without any apparent thorough thought to safety--and we now have, likely clueless, copycats asking how much does it cost to put our hobby at risk . . . sheesh!
Log In to reply
Log In to reply
Log In to reply
Log In to reply
Log In to reply
Log In to reply